

Using a wig, you will want to make it look as natural as possible. And plucking a wig is one move to go. How to pluck a wig, and why and when should you do it? This blog post will give you the answers.
Why should we pluck a wig?
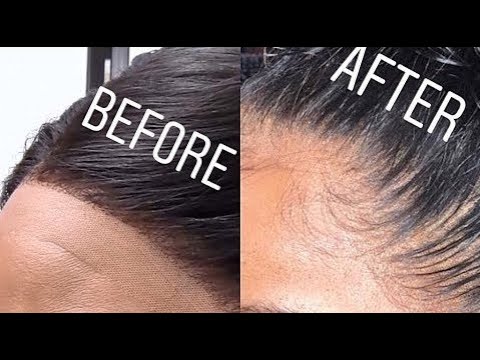
Most time, your hairline is the first thing people notice when looking at your wig. Therefore, to give your wig the look of a natural hairline, you should pluck it, especially if your wig is a lace front wig.
Wigs frequently have a hairline that is overly dense, too far front, or straight across. You can correct that by plucking your wig with tweezers so that it resembles your own hairline. If plucking is done correctly, the front of your wig will have a density that is comparable to natural hair. The hair of the wig will look like it grows from your scalp.
Plucking should be done after the bleaching knot process if you determine that your wig knots need to be plucked and bleached. Yet, if you don’t need to bleach the knots, feel free to pluck your wig as soon as you unbox it.
What tools do you need to pluck a wig?
- A wig (both synthetic wigs and human hair wigs can be plucked)
- Wig head or wig stand
- A tweezer
- A wide-tooth comb and a rat-tail comb
- Some pins
How to pluck a wig?
Step 1: Put the wig on the wig head.
Place the wig on your wig head. Make sure to keep your wig stay in place on the wig stand. You can add some T-pins for a stronger hold.
Step 2: Detangle your wig
Comb through your wig to remove any knots and tangles since tangled hair can affect the plucking process. You should pay attention to the hairs near the hairline. They need to be completely tangle-free and silky for the best result of plucking.
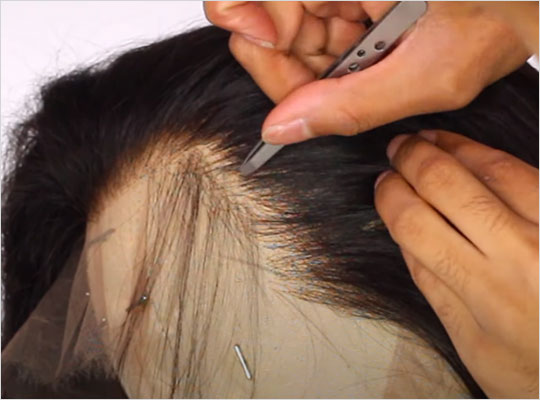
Step 3: Pluck your wig
If this is your first time plucking a wig, just do it as slowly as you want. Don’t rush plucking the hair to avoid making your hairline appear rushed and sloppy. Below is how you should do when it comes to plucking a wig:
- Use the end of a rat-tail comb to separate a small section of the wig and let it hang freely.
- Secure the rest hair of the wig
- Take the tweezer and start plucking the wig, working from above the ear, and make your way to the middle of the head.
- You should hold the hairs near to the roots throughout the plucking procedure to avoid grabbing and pulling the lace. The hairs can be gently tweezed in any direction. Additionally, avoid focusing for too long on a single place because too much plucking will result in bald areas. Once you finish, brush out the hair to remove any loosened strands
Step 4: Pluck more layers
As you can see on your natural mane, the hairs around the hairline go back to more than one layer. Therefore, to achieve a more natural finish, you must pluck more layers of the hairline.
You need to section out some more hair and pluck some hair off the sections that are less thin than the other parts. It gives the hairline an ombre look. Also, the frontals will get a more natural look.
It’s better to pluck at least 3-4 layers of hair for the most natural look.
Step 5: Check the look
Once you’ve finished plucking the layers, check the overall look again. If you think some spots need a bit more plucking, it’s time to do it. However, make sure not to over-pluck your wig in the process.
Step 6: Style your wig
It’s a great idea to create some baby hairs for your wig to make it look more natural. You can also pull the hair back into a ponytail for a better visual representation of what the hairline looks like.
And now, put on your wig and style it any way you like.
So, if you wonder how to pluck a wig correctly, check this post and you can easily do it just within half an hour. Even if you don’t have any tweezer, you can still use your long nails to pluck the wig. Yet, please pay special care during the whole process.
Thanks for reading!